
 Brad Scandrett

Creating an efficient energy harvesting system can be difficult, but it’s easier with the proper tools.
In today’s post, we’ll discuss energy harvesting and its different components with an emphasis on charge controller methods used in energy harvesting, the benefits and drawbacks, and which could be best for your application.
Watch the webinar version of this blog post and download the slide deck.
Take this blog post with you!
Components of an Energy Harvesting System
All energy harvesting solutions include an end device you want to power, a storage element (usually a battery or super cap) to store the harvested power, electronics that manage power directed to the battery and electric load, and an energy harvesting source.
%20diagram-2.png?width=305&height=237&name=Solar%20Development%20Kit%20with%20e-peas%20PMIC%20and%20CAP-XX%20Supercapacitors%20(DEV-EPEAS-CAPXX)%20diagram-2.png)
Different Kinds of Energy Harvesting
Thermoelectric
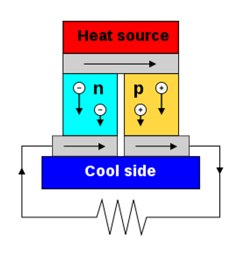
Thermoelectric generators produce power when you have heat on one side and cooling on the other. The temperature differential between the two is what generates energy. A reasonable estimate is up to 0.6mW/cm2 per degree Kelvin. With this device, you must ensure you don't reach thermal saturation. You must continue to cool on the cool side and have the heat on the heat side. This can become very difficult as the cooling side can eventually become as hot as the heat source, decreasing the power you can generate.
Piezoelectric
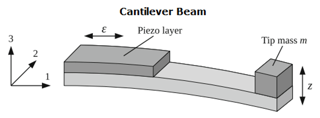
Piezoelectric is a vibration-type generator converting mechanical motion into magnetic energy that then generates usable power. Identifying a specific estimate of power generation is difficult. Still, as a general rule, the number will be significantly lower than comparably sized thermal electric, radio frequency, and photovoltaic energy harvesters.
Radio Frequency (RF)
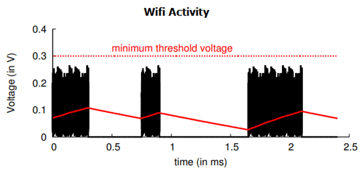
Airwaves surround us, meaning RF energy can be harvested using an antenna, this includes AM/FM radio, ZigBee, and Wi-Fi. All of these RF sources can be harvested to generate power. You can expect to create up to 1.6mW/cm2.
Solar Photovoltaic
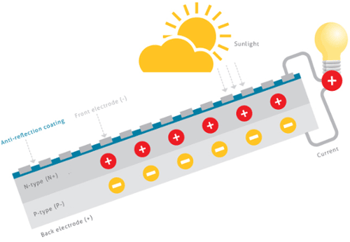
Solar Photovoltaic takes any light source, such as the sun, LED, or indirect sunlight, and produces electricity. This method produces about 3.2uW/cm2 per 100 Lux. For reference, grocery stores and retail lighting are often around 1000 Lux, making these locations ideal for indoor light energy harvesting.
Elements of an IV Curve
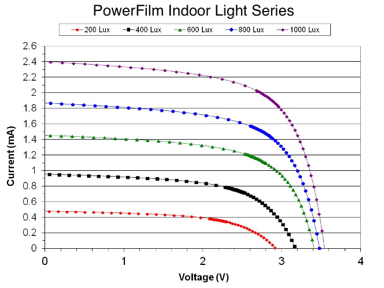
Solar modules, for the most part, are very linear in their output and current tracks with light intensity. This changes when you drop below 10% of full sun (1000W/m2 of light intensity), once it drops below that, the series resistance of the panel starts to take over. The open circuit voltage of the solar panel starts to drop. The fill factor is lower, which means the power point or knee of the curve gets flatter in varying light conditions, from 200 to 1000 Lux. The curves change where the power point is. For this panel, it varies from 2.4V at 200 Lux up to 3V at 1000 Lux. It’s important to remember that you need circuitry that can accommodate that change.
Overview of Charge Controllers and Why They Are Necessary
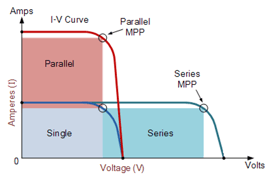
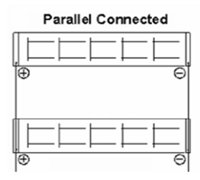
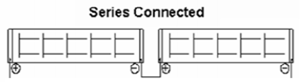
Why do I need a charge controller? As you can see from the previous curves, depending on how many cells you have in series or parallel, the maximum power point of the solar device can vary greatly. In a series connection, the voltage doubles; in a parallel connection, the current doubles. You need to select a charge controller to accommodate these differences.
PWM vs. MPPT Charging
%20graph-1.png?width=313&height=272&name=MPPT%20vs%20PWM%2012V%20(Battery%20Low%2010.5V)%20graph-1.png)
%20graph-1.png?width=313&height=264&name=MPPT%20vs%20PWM%2012V%20(Battery%20Full%2013.5V)%20graph-1.png)
The graphs above show a typical 12V lead acid battery fully discharged and then fully charged, going from 10.5V to 13.5V. The orange section shows you a PWM charge controller power transfer. When a battery is fully discharged, the PWM pulls the solar panel down to the battery voltage. By doing so, you run on the flat part of the curve, the short circuit element of it. This will charge the battery at a slower rate than a maximum power point tracking (MPPT) charge controller will.
MPPT controllers harvest more energy and finish charging storage elements faster than PWM. MPPT controllers hold the panel at the maximum power point on the curve and convert all of that additional power (shown in the blue section) to current. On a fully discharged battery, you can generate about 55% more power with an MPPT charger vs. a PWM. Even when the battery is fully charged, you can harvest more power. The graph on the right shows the battery at 13.5V (the panel being used has a power point of 17V or 18V in this case) you can generate up to 20% more power vs. PWM.
Variations of Maximum Power Point Tracking
There are several MPPT methods, each with different meanings. These variations include fixed power point tracking (FPPT), ratio power point tracking (RPPT), and true maximum power point tracking (MPPT).
Fixed Power Point Tracking
The graph below shows each of these methods. The yellow line illustrates an FPPT charge controller. FPPTs require users to set/program the controller at a specific voltage. While they don’t track the solar panel, they still convert power that matches the battery voltage. They do this while holding the solar panel at the user-programmed specific voltage.
Ratio Power Point Tracking
With this method, you program the desired ratio depending on the fill factor of the solar module. If you look at the graph, the fill factor is the ratio of VPP x Ipp ÷ Voc x Isc. Said another way, it's the maximum power point divided by the endpoints. As the fill factor lowers, the panel's maximum power point drops, as you can see in these curves below, the power point shifts down and to the left. You may be dead on with a ratio power point tracker with a cell at a certain time, but as the illumination of that cell changes based on different Lux conditions, the power point may drift off some, though the net result may only be a few microwatts.
Maximum Power Point Tracking
True MPPT does just that, it tracks the maximum power of the solar panel in real-time. This technology holds the solar panel at its maximum power point and gives the maximum power from the panel in changing lighting conditions.
![]()
Boost and Buck Charge Controller Topologies
Maximum Power Point Tracking (MPPT)
There are three types of MPPT, Buck, Boost, and Buck/Boost. Buck controllers take a higher-voltage solar panel and buck it down to your battery voltage. Buck controllers have traditionally been used with large solar arrays, which almost always run higher voltage than the battery they're attached to. Boost topology takes a lower-voltage solar panel and boosts it up to your battery voltage. In energy harvesting scenarios, having a single-cell, two-cell, or three-cell device is much more desirable due to space constraints and the interconnection associated with multiple cells. You typically have a boost topology that will take a 0.6-1.2V single cell and boost up to a 3-5V battery.
Pulse Width Modulation (PWM)
A PWM circuit requires a higher-voltage solar panel with a lower-voltage battery. Some of the advantages of a PWM circuit include fewer parts and lower cost. The greatest disadvantage of the PWM circuit is the loss of power between what’s available from the solar panel and what actually goes into the battery. On average, you can calculate about 30-35% less power from a PWM circuit over an MPPT.
Direct Charging
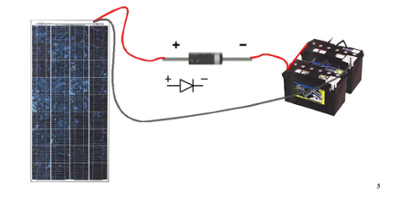
If your project can’t afford a charge controller and you have room, you can oversize a battery and use a small solar panel. This may be your best option if you just need to trickle-charge that battery. We don't recommend exceeding 1% of the battery capacity. The solar panel should produce no more than 1% of the amp hour rating of the battery. For example, a typical car battery is about 50Ah, the recommended panel would produce about 500mA at power point. This can only be used on lead-acid batteries, NiCads, and some NiMh’s. This is never recommended for Li-ion batteries, a charging circuit is required with over-voltage, under-voltage, and over-current protection on all lithium battery technologies. You can also use this method for capacitors. Once the capacitor is full, no current will flow, this is because the capacitor becomes resistant to voltage as the voltage climbs to the rated voltage of the capacitor. The Voc of the panel and the capacitor must match, or the panel Voc must be slightly below the capacitor.
What are PMICs, and Why are they Useful in an Energy Harvesting Solution?
PMICs harvest tiny bits of power from energy sources, all with ultra-low power consumption and over-voltage and under-voltage protection. This is critical for any lithium battery technology and is also valuable for other battery technologies. PMICs often have programming to utilize supercaps and even add a primary battery. Primary batteries are used as backup when your main system battery fails, or if not enough energy has been harvested, a primary battery can kick in and take over.
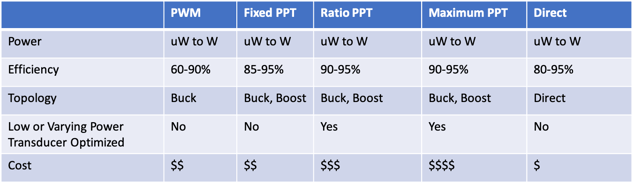
How to Determine the Best Charging Methods for Your Application
There is not a one size fits all answer, but we can point you in the right direction. Below is a graph highlighting the cost and benefits of each option. If you need the least expensive option, direct charging works. If you can spend more, you can opt for a PWM circuit. If the price is secondary and you need the absolute best performance, a true MPPT may be the best solution for your application.
What’s the Best Way to Start Experimenting with Energy Harvesting?
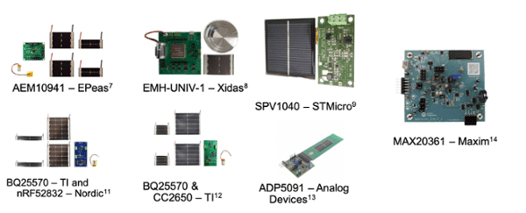
Solar development kits are a great way to start providing storage elements, electronics, a PMIC (from e-peas, STMicro, Analog Devices, TI, Nordic, etc.), and energy harvesting devices (solar, kinetic, piezoelectric etc.).
Available Energy Harvesting IC Options
Xidas
If you use vibration for energy harvesting, the Xidas EHM-UNV-1 is an option with a low quiescent current, a nice LDO regulator, and a decent output. It is a large chip, 25mm x 25mm and quite expensive for a PMIC, but Xidas is one of the few companies providing a vibration energy harvesting solution.
e-peas
If you need the least power consumption and the best option for harvesting tiny amounts of power, the e-peas AEM10941 will only suck up 3mW of power. It also features a super low quiescent current, second only to the Xidas chip at 400nA (Learn more about our Solar Development Kit with e-peas PMIC and CAP-XX Supercapacitors (DEV-EPEAS-CAPXX).
ST Micro
If you have an application where you will be outside in the sun and have plenty of power available, the SPV1D40 will go up to 1.8A and is cost-effective.
Texas Instruments & Nordic
TI makes several BQ series chips with an excellent input voltage range from 0.1V up to 5.1V, narrowing out the e-peas by 0.1V on the top end.
TI and Nordic make quality energy-harvesting BQ chips (learn more about our Solar Development Kit with Nordic BLE(DEV-BLE-NS) to experiment with low-energy Bluetooth transceiver information). If you need to set up a mesh network, that's fairly easy to do with Nordics in RF 52832.
Analog Devices
If you have limited space and need a small chip, the MAX20361 comes in at a 1.23mm x 1.63mm package and is reasonably priced.
Watch the webinar version of this blog post and download the slide deck.
Take this blog post with you!
Please contact us if you have any questions about energy harvesting in general or solar energy harvesting in specific. We would be happy to assist you!