
PV cells have the potential to supplement
power to a wide range of IoT and battery-powered electronics.
These devices are often compact, and connecting a PV cell directly to the embedded PCB circuitry is often necessary.
There are different ways to achieve this, depending on your application and manufacturing needs.
Take this blog post with you!
PowerFilm PV Anatomy
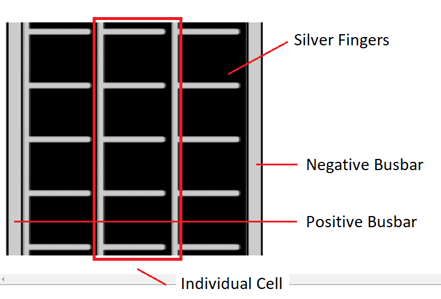
Before diving into the various methods, it is helpful to understand the basic anatomy of our PV cells.
A typical PowerFilm module consists of one or more cells connected in series, with tinned foil bus tape on each end of the module for positive and negative connection points.
The entire module is encapsulated in a protective laminate which must be burned through or removed to make an electrical connection.
Soldering
Manual (or robotic) soldering is a simple and easy way to connect a PV cell to a PC board via wire leads or solder tabs. Soldering is an excellent method for prototyping, low to moderate volume production, and devices that require the PV cell to be externally mounted away from the PCB.
Leads can be soldered directly to the top of the foil bus tape through the protective laminate, or contacts can be exposed on the backside of the module. First, with a soldering iron, burn/scrape away a small area of laminate and apply a small solder dot. Then solder the pre-tinned leads to the solder dots and inspect for clean, high-quality joints.
Always solder on a heat-dissipating surface, such as aluminum, and use the lowest iron temperature possible. Excess heat during soldering can cause distortion and delamination in the surrounding laminate. Be sure to solder in the middle of the foil tape and away from the module edge to maximize laminate strength around the solder joint and to prevent delamination.
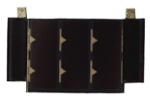
Solder tabs can also be cut into the foil bus tape. When paired with plated slots in a PCB, these modules can be selective soldered like a traditional through-hole part. Make sure any automated processes do not allow the PV cell to exceed the rated laminate temperature.
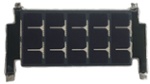
Exposed panel tabs inserted and soldered through PCB with plated slots (left). Leads soldered to foil bus tape (middle). PV module with tinned solder tabs (right).
Flex Connector Tabs
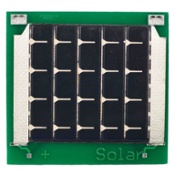
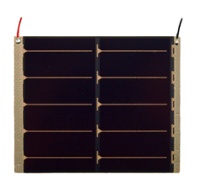
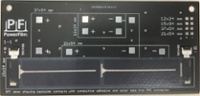
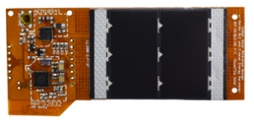
Our PV modules can be configured with exposed tabs that fit into standard Flex PC connectors. These connectors are low profile and feature zero insertion force or lever clamp mechanism. With no soldering or conductive paste, this is a mess-free method that you can implement with reasonable volume efficiency.
To use this method, add an FPC connector footprint layout to your PCB in locations corresponding to the tabs on the PV cell. Make sure the connector FPC height matches the thickness of the PCB tabs. Insert the tabs into the connector and engage the clamping mechanism if applicable.
These connectors will provide excellent electrical connection with a pull strength between 0.5 and 1lb each. If increased strength is required, use mechanical glue dots or tape to hold the panel in place.
![]()
Tabbed panel mounted with FPC connectors (left). Stock FPC tabbed panels (right) INP3.6-24x44T and INP2.4-10x94T.
Conductive Epoxy
Low temperature or room temperature cure conductive epoxy is a replacement for traditional high temp solder reflow processing. Our PV modules can be sourced in trays or reels and set up on a high-volume SMT assembly line.
There are many conductive epoxies available with a wide range of characteristics and cure conditions. There are often trade-offs between electrical/mechanical properties and ease of application.
ConductiveX Electro-Bond 17: two-part silver-filled flexible epoxy. This conductive epoxy has excellent electrical conductivity and mechanical strength. It is ideal for bonding PV cells to flex circuits in an indoor or outdoor power generation scenario and is resistant to thermal stress.
Panacol Ecolit 3036: two-part silver-filled flexible epoxy. This epoxy features excellent mechanical strength and flexibility with lower conductivity. It is a great choice for indoor PV applications that operate at lower power levels.
Conductive epoxy can be applied via stencil or dispensing gun (manual or robotic). Maintaining pressure is recommended during the curing process to ensure a high-quality bond.
Mechanical glue dots or tape are recommended if the conductive epoxy joint may experience mechanical stress when the device is deployed. Increasing the size and number of epoxy contacts will increase bond strength and electrical conductivity.
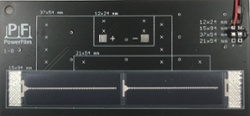
PV cell mounted with conductive epoxy on a rigid PCB (left) and a flex PCB (right).
Screw Terminals and Connectors
More common for larger style solar panels and arrays, screw terminals and cable to board mount connectors can still be used at a smaller scale for IoT devices.
Screw terminals are most beneficial in a prototyping environment where a leaded PV module can be connected, disconnected, and swapped quickly (this is the connection method we use for our Solar Development Kits).
Connectors allow a modular approach where PV can be installed and connected in the field or replaced if damaged.
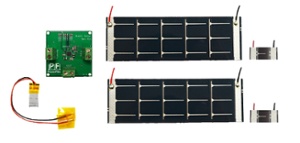
DEV-BASIC development kit with screw terminals for quickly connecting and disconnecting leaded panels.
There are many ways to connect a PV cell to a PCB. The best method depends on your specific device, application, and use case.
We are continuously improving the usability of our solar products and always looking for new innovative ways our customers can integrate our PV into their technology.
If you have any questions about connecting a PV cell to your device or product, please contact us, and we can help determine the best method for your specific needs.
Take this blog post with you!